教程 4:深入控制器(30 分钟)
现在我们要开始处理与机器人控制器编程相关的主题。 我们将设计一个简单的控制器,用于避开在前几个教程中创建的障碍物。
本教程将向你介绍在 Webots 中进行机器人编程的基础知识。 读完本章后,你应当能够理解:场景树节点与控制器 API 之间的联系、机器人控制器如何初始化和清理、如何初始化机器人设备、如何获取传感器数值、如何驱动执行器,以及如何编写一个简单的反馈循环。
本教程只讨论 Webots 函数的正确用法。 机器人算法的研究超出了本教程的目标,因此这里不会涉及。 阅读本章需要具备一些基础的编程知识(任何 C 语言教程都足以作为入门)。 本章结尾给出了进一步学习机器人算法的链接。
新世界与新控制器
动手实践 #1:将上一个世界保存为
collision_avoidance.wbt。 通过 File / New / New Robot Controller... 菜单项创建一个名为epuck_avoid_collision的新 C(或其他语言)控制器(对于 C++ 和 Java,请将其命名为EPuckAvoidCollision)。 修改E-puck节点的controller字段,使其关联到这个新控制器。
提醒:如何创建一个新控制器?
选择 File / New / New Robot Controller... 菜单项,然后选择你的编程语言和文件名。
理解 e-puck 模型
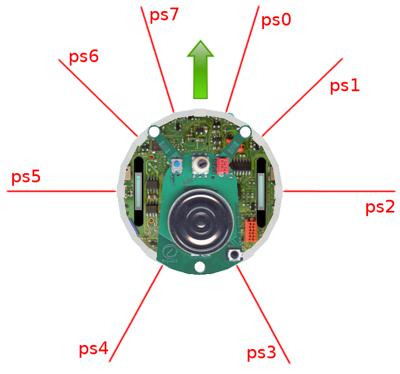
控制器编程需要了解一些与 e-puck 模型相关的信息。 为了创建避障算法,我们需要读取分布在它炮塔(turret)周围的 8 个红外距离传感器的数值,并且需要驱动它的两个轮子。 距离传感器在炮塔周围的分布方式以及 e-puck 的前进方向如该图所示。
距离传感器由机器人层级结构中的 8 个 [DistanceSensor(https://cyberbotics.com/doc/reference/distancesensor) 节点建模。
这些节点通过各自的 name 字段来引用(从 ps0 到 ps7)。
这些节点如何定义,我们稍后会解释。
目前只需注意:[DistanceSensor(https://cyberbotics.com/doc/reference/distancesensor) 节点可以通过 Webots API 的相关模块进行访问(通过 webots/distance_sensor.h 头文件)。
距离传感器返回的数值被缩放至 0 到 4096 之间(与距离分段线性相关)。
其中 4096 表示测量到大量光线(障碍物很近),0 表示没有测量到光线(没有障碍物)。
控制器 API 是让你访问机器人仿真传感器和执行器的编程接口。
例如,包含 webots/distance_sensor.h 文件后就可以使用 wb_distance_sensor_* 函数,通过这些函数你可以查询 [DistanceSensor(https://cyberbotics.com/doc/reference/distancesensor) 节点的数值。
关于 API 函数的文档可以在[参考手册(https://cyberbotics.com/doc/reference/nodes-and-api-functions)中找到,其中还包含每个节点的说明。
graph LR
  init[initialize robot] --> step[simulation step]
    subgraph feedback loop
      step --> read[read sensors]
      read --> process[process behavior]
      process --> write[write actuators]
        write --> step
    end
step --> cleanup[cleanup robot]编写控制器程序
我们想编写一个非常简单的避障行为。 你将编程让机器人一直向前行驶,直到前方的距离传感器检测到障碍物,然后转向无障碍的方向。 为此,我们将使用该图中 UML 状态机所描述的简单反馈循环。
该控制器的完整代码将在下一小节给出。
动手实践 #2:在控制器文件的开头,添加与 [Robot(https://cyberbotics.com/doc/reference/robot)、[DistanceSensor(https://cyberbotics.com/doc/reference/distancesensor) 和 [Motor(https://cyberbotics.com/doc/reference/motor) 节点对应的 include 指令,以便能够使用相应的 API:
#include <webots/robot.h>
#include <webots/distance_sensor.h>
#include <webots/motor.h>
动手实践 #2:在控制器文件的开头,添加与 [Robot(https://cyberbotics.com/doc/reference/robot)、[DistanceSensor(https://cyberbotics.com/doc/reference/distancesensor) 和 [Motor(https://cyberbotics.com/doc/reference/motor) 节点对应的 include 指令,以便能够使用相应的 API:
#include <webots/Robot.hpp>
#include <webots/DistanceSensor.hpp>
#include <webots/Motor.hpp>
在 include 语句之后,立即使用 webots 命名空间,这是使用 webots 类所必需的。
// All the webots classes are defined in the "webots" namespace
using namespace webots;
动手实践 #2:在控制器文件的开头,添加与 [Robot(https://cyberbotics.com/doc/reference/robot)、[DistanceSensor(https://cyberbotics.com/doc/reference/distancesensor) 和 [Motor(https://cyberbotics.com/doc/reference/motor) 节点对应的 import 指令,以便能够使用相应的 API:
from controller import Robot, DistanceSensor, Motor动手实践 #2:在控制器文件的开头,添加与 [Robot(https://cyberbotics.com/doc/reference/robot)、[DistanceSensor(https://cyberbotics.com/doc/reference/distancesensor) 和 [Motor(https://cyberbotics.com/doc/reference/motor) 节点对应的 import 指令,以便能够使用相应的 API:
import com.cyberbotics.webots.controller.Robot;
import com.cyberbotics.webots.controller.DistanceSensor;
import com.cyberbotics.webots.controller.Motor;
在 import 语句之后,创建 EPuckAvoidCollision class(类的名称必须与文件名完全一致)以及 main 函数。
public class EPuckAvoidCollision {

  public static void main(String[] args) {

  }
}
动手实践 #2:在控制器文件的开头,添加 function 声明(名称必须与文件名完全一致)。
function epuck_avoid_collisionmain 函数是控制器程序开始执行的地方。
传给 main 函数的参数由 [Robot(https://cyberbotics.com/doc/reference/robot) 节点的 controllerArgs 字段给出。
必须使用 wb_robot_init 函数来初始化 Webots API,并在退出前使用 wb_robot_cleanup 函数进行清理。
我们还使用 wb_robot_get_basic_time_step 函数来获取 [WorldInfo(https://cyberbotics.com/doc/reference/worldinfo) 节点中 basicTimeStep 字段的值。
该时长以毫秒为单位,定义了控制器(在仿真时间内)运行的频率。
该值作为 wb_robot_step 函数的参数使用,同时也会用于启用设备。
动手实践 #3:按如下方式编写 main 函数的原型:
// entry point of the controller
int main(int argc, char **argv) {
  // initialize the Webots API
  wb_robot_init();
  // get the time step of the current world
  const int time_step = (int) wb_robot_get_basic_time_step();
  // initialize devices
  // feedback loop: step simulation until receiving an exit event
  while (wb_robot_step(time_step) != -1) {
    // read sensors outputs
    // process behavior
    // write actuators inputs
  }
  // cleanup the Webots API
  wb_robot_cleanup();
  return 0; //EXIT_SUCCESS
}
动手实践 #3:按如下方式编写 main 函数的原型:
// entry point of the controller
int main(int argc, char **argv) {
  // create the Robot instance.
  Robot *robot = new Robot();
  // get the time step of the current world
  int timeStep = (int)robot->getBasicTimeStep();
  // initialize devices
  // feedback loop: step simulation until receiving an exit event
  while (robot->step(timeStep) != -1) {
    // read sensors outputs
    // process behavior
    // write actuators inputs
  }
  delete robot;
  return 0; //EXIT_SUCCESS
}
动手实践 #3:在 Python 中没有 main 函数,程序从文件开头开始执行:
# create the Robot instance.
robot = Robot()
# get the time step of the current world
timestep = int(robot.getBasicTimeStep())
# initialize devices
# feedback loop: step simulation until receiving an exit event
while robot.step(timestep) != -1:
    # read sensors outputs
    # process behavior
    # write actuators inputs
动手实践 #3:按如下方式编写 main 函数的原型:
// entry point of the controller
public static void main(String[] args) {
  // create the Robot instance.
  Robot robot = new Robot();
  // get the time step of the current world
  int timeStep = (int) robot.getBasicTimeStep();
  // initialize devices
  // feedback loop: step simulation until receiving an exit event
  while (robot.step(timeStep) != -1) {
    // read sensors outputs
    // process behavior
    // write actuators inputs
  };
}
动手实践 #3:在 MATLAB 中,"main" 函数就是文件开头的函数定义:
% get the time step of the current world
TIME_STEP = wb_robot_get_basic_time_step();
% initialize devices
% feedback loop: step simulation until receiving an exit event
while wb_robot_step(TIME_STEP) ~= -1
  % read sensors outputs
  % process behavior
  % write actuators inputs
  % if your code plots some graphics, it needs to flushed like this:
  drawnow;
end
机器人设备由一个 WbDeviceTag 来引用。
WbDeviceTag 通过 wb_robot_get_device 函数获取。
之后在所有涉及该设备的函数调用中,它都被用作第一个参数。
像 [DistanceSensor(https://cyberbotics.com/doc/reference/distancesensor) 这样的传感器在使用前必须先启用。
启用函数的第二个参数定义了传感器的刷新频率。
动手实践 #4:在注释 // initialize devices 之后,按如下方式获取并启用距离传感器:
// initialize devices
int i;
WbDeviceTag ps[8];
char ps_names[8][4] = {
  "ps0", "ps1", "ps2", "ps3",
  "ps4", "ps5", "ps6", "ps7"
};

for (i = 0; i < 8; i++) {
  ps[i] = wb_robot_get_device(ps_names[i]);
  wb_distance_sensor_enable(ps[i], time_step);
}
设备初始化之后,再初始化电机:
WbDeviceTag left_motor = wb_robot_get_device("left wheel motor");
WbDeviceTag right_motor = wb_robot_get_device("right wheel motor");
wb_motor_set_position(left_motor, INFINITY);
wb_motor_set_position(right_motor, INFINITY);
wb_motor_set_velocity(left_motor, 0.0);
wb_motor_set_velocity(right_motor, 0.0);
在主循环中,紧跟在注释 // read sensors outputs 之后,按如下方式读取距离传感器的数值:
// read sensors outputs
double ps_values[8];
for (i = 0; i < 8 ; i++)
  ps_values[i] = wb_distance_sensor_get_value(ps[i]);
在主循环中,紧跟在注释 // process behavior 之后,按如下方式检测是否发生碰撞(即某个距离传感器返回的数值大于阈值):
// detect obstacles
bool right_obstacle =
  ps_values[0] > 80.0 ||
  ps_values[1] > 80.0 ||
  ps_values[2] > 80.0;
bool left_obstacle =
  ps_values[5] > 80.0 ||
  ps_values[6] > 80.0 ||
  ps_values[7] > 80.0;
最后,利用障碍物的信息来驱动轮子,如下所示:
#define MAX_SPEED 6.28
...
// initialize motor speeds at 50% of MAX_SPEED.
double left_speed  = 0.5 * MAX_SPEED;
double right_speed = 0.5 * MAX_SPEED;
// modify speeds according to obstacles
if (left_obstacle) {
  // turn right
  left_speed  = 0.5 * MAX_SPEED;
  right_speed = -0.5 * MAX_SPEED;
}
else if (right_obstacle) {
  // turn left
  left_speed  = -0.5 * MAX_SPEED;
  right_speed = 0.5 * MAX_SPEED;
}
// write actuators inputs
wb_motor_set_velocity(left_motor, left_speed);
wb_motor_set_velocity(right_motor, right_speed);
通过选择 Build / Build 菜单项来编译你的代码。
编译错误会以红色显示在控制台中。
如果有错误,请修复它们并重新编译。
重新加载世界。
动手实践 #4:在注释 // initialize devices 之后,按如下方式获取并启用距离传感器:
// initialize devices
DistanceSensor *ps[8];
char psNames[8][4] = {
  "ps0", "ps1", "ps2", "ps3",
  "ps4", "ps5", "ps6", "ps7"
};

for (int i = 0; i < 8; i++) {
  ps[i] = robot->getDistanceSensor(psNames[i]);
  ps[i]->enable(timeStep);
}
设备初始化之后,再初始化电机:
Motor *leftMotor = robot->getMotor("left wheel motor");
Motor *rightMotor = robot->getMotor("right wheel motor");
leftMotor->setPosition(INFINITY);
rightMotor->setPosition(INFINITY);
leftMotor->setVelocity(0.0);
rightMotor->setVelocity(0.0);
在主循环中,紧跟在注释 // read sensors outputs 之后,按如下方式读取距离传感器的数值:
// read sensors outputs
double psValues[8];
for (int i = 0; i < 8 ; i++)
  psValues[i] = ps[i]->getValue();
在主循环中,紧跟在注释 // process behavior 之后,按如下方式检测是否发生碰撞(即某个距离传感器返回的数值大于阈值):
// detect obstacles
bool right_obstacle =
  psValues[0] > 80.0 ||
  psValues[1] > 80.0 ||
  psValues[2] > 80.0;
bool left_obstacle =
  psValues[5] > 80.0 ||
  psValues[6] > 80.0 ||
  psValues[7] > 80.0;
最后,利用障碍物的信息来驱动轮子,如下所示:
#define MAX_SPEED 6.28
...
// initialize motor speeds at 50% of MAX_SPEED.
double leftSpeed  = 0.5 * MAX_SPEED;
double rightSpeed = 0.5 * MAX_SPEED;
// modify speeds according to obstacles
if (left_obstacle) {
  // turn right
  leftSpeed  = 0.5 * MAX_SPEED;
  rightSpeed = -0.5 * MAX_SPEED;
}
else if (right_obstacle) {
  // turn left
  leftSpeed  = -0.5 * MAX_SPEED;
  rightSpeed = 0.5 * MAX_SPEED;
}
// write actuators inputs
leftMotor->setVelocity(leftSpeed);
rightMotor->setVelocity(rightSpeed);
通过选择 Build / Build 菜单项来编译你的代码。
编译错误会以红色显示在控制台中。
如果有错误,请修复它们并重新编译。
重新加载世界。
动手实践 #4:在注释 // initialize devices 之后,按如下方式获取并启用距离传感器:
# initialize devices
ps = []
psNames = [
    'ps0', 'ps1', 'ps2', 'ps3',
    'ps4', 'ps5', 'ps6', 'ps7'
]

for i in range(8):
    ps.append(robot.getDevice(psNames[i]))
    ps[i].enable(timestep)
设备初始化之后,再初始化电机:
leftMotor = robot.getDevice('left wheel motor')
rightMotor = robot.getDevice('right wheel motor')
leftMotor.setPosition(float('inf'))
rightMotor.setPosition(float('inf'))
leftMotor.setVelocity(0.0)
rightMotor.setVelocity(0.0)
在主循环中,紧跟在注释 # read sensors outputs 之后,按如下方式读取距离传感器的数值:
# read sensors outputs
psValues = []
for i in range(8):
    psValues.append(ps[i].getValue())
在主循环中,紧跟在注释 # process behavior 之后,按如下方式检测是否发生碰撞(即某个距离传感器返回的数值大于阈值):
# detect obstacles
right_obstacle = psValues[0] > 80.0 or psValues[1] > 80.0 or psValues[2] > 80.0
left_obstacle = psValues[5] > 80.0 or psValues[6] > 80.0 or psValues[7] > 80.0
最后,利用障碍物的信息来驱动轮子,如下所示:
MAX_SPEED = 6.28
...
# initialize motor speeds at 50% of MAX_SPEED.
leftSpeed  = 0.5 * MAX_SPEED
rightSpeed = 0.5 * MAX_SPEED
# modify speeds according to obstacles
if left_obstacle:
    # turn right
    leftSpeed  = 0.5 * MAX_SPEED
    rightSpeed = -0.5 * MAX_SPEED
elif right_obstacle:
    # turn left
    leftSpeed  = -0.5 * MAX_SPEED
    rightSpeed = 0.5 * MAX_SPEED
# write actuators inputs
leftMotor.setVelocity(leftSpeed)
rightMotor.setVelocity(rightSpeed)
通过选择 File / Save Text File 菜单项来保存你的代码。
重新加载世界。
动手实践 #4:在注释 // initialize devices 之后,按如下方式获取并启用距离传感器:
// initialize devices
DistanceSensor[] ps = new DistanceSensor[8];
String[] psNames = {
  "ps0", "ps1", "ps2", "ps3",
  "ps4", "ps5", "ps6", "ps7"
};

for (int i = 0; i < 8; i++) {
  ps[i] = robot.getDistanceSensor(psNames[i]);
  ps[i].enable(timeStep);
}
设备初始化之后,再初始化电机:
Motor leftMotor = robot.getMotor("left wheel motor");
Motor rightMotor = robot.getMotor("right wheel motor");
leftMotor.setPosition(Double.POSITIVE_INFINITY);
rightMotor.setPosition(Double.POSITIVE_INFINITY);
leftMotor.setVelocity(0.0);
rightMotor.setVelocity(0.0);
在主循环中,紧跟在注释 // read sensors outputs 之后,按如下方式读取距离传感器的数值:
// read sensors outputs
double[] psValues = {0, 0, 0, 0, 0, 0, 0, 0};
for (int i = 0; i < 8 ; i++)
  psValues[i] = ps[i].getValue();
在主循环中,紧跟在注释 // process behavior 之后,按如下方式检测是否发生碰撞(即某个距离传感器返回的数值大于阈值):
// detect obstacles
 boolean right_obstacle =
  psValues[0] > 80.0 ||
  psValues[1] > 80.0 ||
  psValues[2] > 80.0;
 boolean left_obstacle =
  psValues[5] > 80.0 ||
  psValues[6] > 80.0 ||
  psValues[7] > 80.0;
最后,利用障碍物的信息来驱动轮子,如下所示:
int MAX_SPEED = 6.28;
...
// initialize motor speeds at 50% of MAX_SPEED.
double leftSpeed  = 0.5 * MAX_SPEED;
double rightSpeed = 0.5 * MAX_SPEED;
// modify speeds according to obstacles
if (left_obstacle) {
  // turn right
  leftSpeed  = 0.5 * MAX_SPEED;
  rightSpeed = -0.5 * MAX_SPEED;
}
else if (right_obstacle) {
  // turn left
  leftSpeed  = -0.5 * MAX_SPEED;
  rightSpeed = 0.5 * MAX_SPEED;
}
// write actuators inputs
leftMotor.setVelocity(leftSpeed);
rightMotor.setVelocity(rightSpeed);
通过选择 Build / Build 菜单项来编译你的代码。
编译错误会以红色显示在控制台中。
如果有错误,请修复它们并重新编译。
重新加载世界。
动手实践 #4:在注释 % initialize devices 之后,按如下方式获取并启用距离传感器:
% initialize devices
ps = [];
ps_names = [ "ps0", "ps1", "ps2", "ps3", "ps4", "ps5", "ps6", "ps7" ];

for i = 1:8
  ps(i) = wb_robot_get_device(convertStringsToChars(ps_names(i)));
  wb_distance_sensor_enable(ps(i), TIME_STEP);
end
设备初始化之后,再初始化电机:
left_motor = wb_robot_get_device('left wheel motor');
right_motor = wb_robot_get_device('right wheel motor');
wb_motor_set_position(left_motor, inf);
wb_motor_set_position(right_motor, inf);
wb_motor_set_velocity(left_motor, 0.0);
wb_motor_set_velocity(right_motor, 0.0);
在主循环中,紧跟在注释 % read sensors outputs 之后,按如下方式读取距离传感器的数值:
% read sensors outputs
ps_values = [];
for i = 1:8
  ps_values(i) = wb_distance_sensor_get_value(ps(i));
end
在主循环中,紧跟在注释 % process behavior 之后,按如下方式检测是否发生碰撞(即某个距离传感器返回的数值大于阈值):
% detect obstacles
right_obstacle = ps_values(1) > 80.0 | ps_values(2) > 80.0 | ps_values(3) > 80.0;
left_obstacle = ps_values(6) > 80.0 | ps_values(7) > 80.0 | ps_values(8) > 80.0;
最后,利用障碍物的信息来驱动轮子,如下所示:
MAX_SPEED = 6.28;
...
% initialize motor speeds at 50% of MAX_SPEED.
left_speed  = 0.5 * MAX_SPEED;
right_speed = 0.5 * MAX_SPEED;
% modify speeds according to obstacles
if left_obstacle
  % turn right
  left_speed  = 0.5 * MAX_SPEED;
  right_speed = -0.5 * MAX_SPEED;
elseif right_obstacle
  % turn left
  left_speed  = -0.5 * MAX_SPEED;
  right_speed = 0.5 * MAX_SPEED;
end
% write actuators inputs
wb_motor_set_velocity(left_motor, left_speed);
wb_motor_set_velocity(right_motor, right_speed);
通过选择 File / Save Text File 菜单项来保存你的代码。
重新加载世界。
控制器代码
以下是上一小节所详述的控制器的完整代码。
#include <webots/robot.h>
#include <webots/distance_sensor.h>
#include <webots/motor.h>

#define MAX_SPEED 6.28

// entry point of the controller
int main(int argc, char **argv) {
  // initialize the Webots API
  wb_robot_init();

  // get the time step of the current world (time in [ms] of a simulation step)
  const int time_step = (int) wb_robot_get_basic_time_step();

  // internal variables
  int i;
  WbDeviceTag ps[8];
  char ps_names[8][4] = {
    "ps0", "ps1", "ps2", "ps3",
    "ps4", "ps5", "ps6", "ps7"
  };

  // initialize devices
  for (i = 0; i < 8 ; i++) {
    ps[i] = wb_robot_get_device(ps_names[i]);
    wb_distance_sensor_enable(ps[i], time_step);
  }

  WbDeviceTag left_motor = wb_robot_get_device("left wheel motor");
  WbDeviceTag right_motor = wb_robot_get_device("right wheel motor");
  wb_motor_set_position(left_motor, INFINITY);
  wb_motor_set_position(right_motor, INFINITY);
  wb_motor_set_velocity(left_motor, 0.0);
  wb_motor_set_velocity(right_motor, 0.0);

  // feedback loop: step simulation until an exit event is received
  while (wb_robot_step(time_step) != -1) {
    // read sensors outputs
    double ps_values[8];
    for (i = 0; i < 8 ; i++)
      ps_values[i] = wb_distance_sensor_get_value(ps[i]);

    // detect obstacles
    bool right_obstacle =
      ps_values[0] > 80.0 ||
      ps_values[1] > 80.0 ||
      ps_values[2] > 80.0;
    bool left_obstacle =
      ps_values[5] > 80.0 ||
      ps_values[6] > 80.0 ||
      ps_values[7] > 80.0;

    // initialize motor speeds at 50% of MAX_SPEED.
    double left_speed  = 0.5 * MAX_SPEED;
    double right_speed = 0.5 * MAX_SPEED;

    // modify speeds according to obstacles
    if (left_obstacle) {
      // turn right
      left_speed  = 0.5 * MAX_SPEED;
      right_speed = -0.5 * MAX_SPEED;
    }
    else if (right_obstacle) {
      // turn left
      left_speed  = -0.5 * MAX_SPEED;
      right_speed = 0.5 * MAX_SPEED;
    }

    // write actuators inputs
    wb_motor_set_velocity(left_motor, left_speed);
    wb_motor_set_velocity(right_motor, right_speed);
  }

  // cleanup the Webots API
  wb_robot_cleanup();
  return 0; //EXIT_SUCCESS
}#include <webots/Robot.hpp>
#include <webots/DistanceSensor.hpp>
#include <webots/Motor.hpp>
#define MAX_SPEED 6.28
// All the webots classes are defined in the "webots" namespace
using namespace webots;
// entry point of the controller
int main(int argc, char **argv) {
// create the Robot instance.
Robot *robot = new Robot();
// get the time step of the current world (time in [ms] of a simulation step)
int timeStep = (int)robot->getBasicTimeStep();
// initialize devices
DistanceSensor *ps[8];
char psNames[8][4] = {
"ps0", "ps1", "ps2", "ps3",
"ps4", "ps5", "ps6", "ps7"
};
for (int i = 0; i < 8; i++) {
ps[i] = robot->getDistanceSensor(psNames[i]);
ps[i]->enable(timeStep);
}
Motor *leftMotor = robot->getMotor("left wheel motor");
Motor *rightMotor = robot->getMotor("right wheel motor");
leftMotor->setPosition(INFINITY);
rightMotor->setPosition(INFINITY);
leftMotor->setVelocity(0.0);
rightMotor->setVelocity(0.0);
// feedback loop: step simulation until an exit event is received
while (robot->step(timeStep) != -1) {
// read sensors outputs
double psValues[8];
for (int i = 0; i < 8 ; i++)
psValues[i] = ps[i]->getValue();
// detect obstacles
bool right_obstacle =
psValues[0] > 80.0 ||
psValues[1] > 80.0 ||
psValues[2] > 80.0;
bool left_obstacle =
psValues[5] > 80.0 ||
psValues[6] > 80.0 ||
psValues[7] > 80.0;
// initialize motor speeds at 50% of MAX_SPEED.
double leftSpeed = 0.5 * MAX_SPEED;
double rightSpeed = 0.5 * MAX_SPEED;
// modify speeds according to obstacles
if (left_obstacle) {
// turn right
leftSpeed = 0.5 * MAX_SPEED;
rightSpeed = -0.5 * MAX_SPEED;
}
else if (right_obstacle) {
// turn left
leftSpeed = -0.5 * MAX_SPEED;
rightSpeed = 0.5 * MAX_SPEED;
}
// write actuators inputs
leftMotor->setVelocity(leftSpeed);
rightMotor->setVelocity(rightSpeed);
}
delete robot;
return 0; //EXIT_SUCCESS
}from controller import Robot, DistanceSensor, Motor
MAX_SPEED = 6.28
# create the Robot instance.
robot = Robot()
# get the time step of the current world (time in [ms] of a simulation step)
timestep = int(robot.getBasicTimeStep())
# initialize devices
ps = []
psNames = [
'ps0', 'ps1', 'ps2', 'ps3',
'ps4', 'ps5', 'ps6', 'ps7'
]
for i in range(8):
ps.append(robot.getDevice(psNames[i]))
ps[i].enable(timestep)
leftMotor = robot.getDevice('left wheel motor')
rightMotor = robot.getDevice('right wheel motor')
leftMotor.setPosition(float('inf'))
rightMotor.setPosition(float('inf'))
leftMotor.setVelocity(0.0)
rightMotor.setVelocity(0.0)
# feedback loop: step simulation until receiving an exit event
while robot.step(timestep) != -1:
# read sensors outputs
psValues = []
for i in range(8):
psValues.append(ps[i].getValue())
# detect obstacles
right_obstacle = psValues[0] > 80.0 or psValues[1] > 80.0 or psValues[2] > 80.0
left_obstacle = psValues[5] > 80.0 or psValues[6] > 80.0 or psValues[7] > 80.0
# initialize motor speeds at 50% of MAX_SPEED.
leftSpeed = 0.5 * MAX_SPEED
rightSpeed = 0.5 * MAX_SPEED
# modify speeds according to obstacles
if left_obstacle:
# turn right
leftSpeed = 0.5 * MAX_SPEED
rightSpeed = -0.5 * MAX_SPEED
elif right_obstacle:
# turn left
leftSpeed = -0.5 * MAX_SPEED
rightSpeed = 0.5 * MAX_SPEED
# write actuators inputs
leftMotor.setVelocity(leftSpeed)
rightMotor.setVelocity(rightSpeed)import com.cyberbotics.webots.controller.Robot;
import com.cyberbotics.webots.controller.DistanceSensor;
import com.cyberbotics.webots.controller.Motor;
public class EPuckAvoidCollision {
public static void main(String[] args) {
double MAX_SPEED = 6.28;
// create the Robot instance.
Robot robot = new Robot();
// get the time step of the current world (time in [ms] of a simulation step)
int timeStep = (int) robot.getBasicTimeStep();
// initialize devices
DistanceSensor[] ps = new DistanceSensor[8];
String[] psNames = {
"ps0", "ps1", "ps2", "ps3",
"ps4", "ps5", "ps6", "ps7"
};
for (int i = 0; i < 8; i++) {
ps[i] = robot.getDistanceSensor(psNames[i]);
ps[i].enable(timeStep);
}
Motor leftMotor = robot.getMotor("left wheel motor");
Motor rightMotor = robot.getMotor("right wheel motor");
leftMotor.setPosition(Double.POSITIVE_INFINITY);
rightMotor.setPosition(Double.POSITIVE_INFINITY);
leftMotor.setVelocity(0.0);
rightMotor.setVelocity(0.0);
// feedback loop: step simulation until receiving an exit event
while (robot.step(timeStep) != -1) {
// read sensors outputs
double[] psValues = {0, 0, 0, 0, 0, 0, 0, 0};
for (int i = 0; i < 8 ; i++)
psValues[i] = ps[i].getValue();
// detect obstacles
boolean right_obstacle =
psValues[0] > 80.0 ||
psValues[1] > 80.0 ||
psValues[2] > 80.0;
boolean left_obstacle =
psValues[5] > 80.0 ||
psValues[6] > 80.0 ||
psValues[7] > 80.0;
// initialize motor speeds at 50% of MAX_SPEED.
double leftSpeed = 0.5 * MAX_SPEED;
double rightSpeed = 0.5 * MAX_SPEED;
// modify speeds according to obstacles
if (left_obstacle) {
// turn right
leftSpeed = 0.5 * MAX_SPEED;
rightSpeed = -0.5 * MAX_SPEED;
}
else if (right_obstacle) {
// turn left
leftSpeed = -0.5 * MAX_SPEED;
rightSpeed = 0.5 * MAX_SPEED;
}
// write actuators inputs
leftMotor.setVelocity(leftSpeed);
rightMotor.setVelocity(rightSpeed);
};
}
}function epuck_avoid_collision
% get the time step of the current world (time in [ms] of a simulation step)
TIME_STEP = wb_robot_get_basic_time_step();
MAX_SPEED = 6.28;
% initialize devices
ps = [];
ps_names = [ "ps0", "ps1", "ps2", "ps3", "ps4", "ps5", "ps6", "ps7" ];
for i = 1:8
ps(i) = wb_robot_get_device(convertStringsToChars(ps_names(i)));
wb_distance_sensor_enable(ps(i), TIME_STEP);
end
left_motor = wb_robot_get_device('left wheel motor');
right_motor = wb_robot_get_device('right wheel motor');
wb_motor_set_position(left_motor, inf);
wb_motor_set_position(right_motor, inf);
wb_motor_set_velocity(left_motor, 0.0);
wb_motor_set_velocity(right_motor, 0.0);
% feedback loop: step simulation until receiving an exit event
while wb_robot_step(TIME_STEP) ~= -1
% read sensors outputs
ps_values = [];
for i = 1:8
ps_values(i) = wb_distance_sensor_get_value(ps(i));
end
% detect obstacles
right_obstacle = ps_values(1) > 80.0 | ps_values(2) > 80.0 | ps_values(3) > 80.0;
left_obstacle = ps_values(6) > 80.0 | ps_values(7) > 80.0 | ps_values(8) > 80.0;
% initialize motor speeds at 50% of MAX_SPEED.
left_speed = 0.5 * MAX_SPEED;
right_speed = 0.5 * MAX_SPEED;
% modify speeds according to obstacles
if left_obstacle
% turn right
left_speed = 0.5 * MAX_SPEED;
right_speed = -0.5 * MAX_SPEED;
elseif right_obstacle
% turn left
left_speed = -0.5 * MAX_SPEED;
right_speed = 0.5 * MAX_SPEED;
end
% write actuators inputs
wb_motor_set_velocity(left_motor, left_speed);
wb_motor_set_velocity(right_motor, right_speed);
% if your code plots some graphics, it needs to flushed like this:
drawnow;
end解答:世界文件
要将你的世界与解答进行对比,请在你的文件中找到在[教程 1(tutorial-1-your-first-simulation-in-webots.html)中创建的名为 "my_first_simulation" 的文件夹,然后进入 "worlds" 文件夹,用文本编辑器打开相应的那个世界。 本解答与其他解答一样,位于解答目录中。
总结
以下是你刚刚学到的要点的快速总结:
- 控制器的入口点是
main函数,与任何标准 C 程序相同。 - 在调用
wb_robot_init函数之前,不应调用任何 Webots API 函数。 - 在离开 main 函数之前要调用的最后一个函数是
wb_robot_cleanup函数。 - 设备由其设备节点的
name字段来引用。 可以借助wb_robot_get_device函数获取节点的引用。 - 每个控制器程序都作为 Webots 进程的子进程运行。 控制器进程不与 Webots 共享任何内存(摄像头的图像除外),它可以运行在与 Webots 不同的 CPU(或 CPU 核心)上。
- 控制器代码与 "libController" 动态库链接。 该库负责处理你的控制器与 Webots 之间的通信。
[这一节(controller-programming.html)更详细地讲解了控制器编程。 要想在 Webots 中进一步深入学习机器人编程,你应当仔细阅读它。