教程 3:外观(20 分钟)
本教程的目的是让你熟悉一些与图形渲染相关的节点。合理使用这些节点,可以非常快速地创建外观精美的仿真。良好的图形质量不仅能提升用户体验,对于机器人感知其环境的仿真(摄像头图像处理、循线等)也至关重要。
本教程结束时的效果如此图所示。
新建仿真
动手实践 #1:在上一个教程成果的基础上,使用
File / Save World As...菜单创建一个名为 "appearance.wbt" 的新仿真。
光源
世界的光照明由 [Light(https://cyberbotics.com/doc/reference/light) 节点和 [Background(https://cyberbotics.com/doc/reference/background) 决定。 光照节点有三种类型:[DirectionalLight(https://cyberbotics.com/doc/reference/directionallight)、[PointLight(https://cyberbotics.com/doc/reference/pointlight) 和 [SpotLight(https://cyberbotics.com/doc/reference/spotlight)。 [DirectionalLight(https://cyberbotics.com/doc/reference/directionallight) 模拟来自无限远处的光(例如太阳),[PointLight(https://cyberbotics.com/doc/reference/pointlight) 模拟从一个点发出的光(例如灯泡),而 [SpotLight(https://cyberbotics.com/doc/reference/spotlight) 模拟锥形光(例如手电筒)。 此图展示了它们之间的对比。 每种类型的光照节点都可以投射阴影。 你可以在[参考手册(https://cyberbotics.com/doc/reference/nodes-and-api-functions)中找到它们的完整文档。
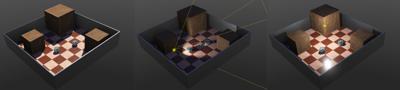
光照在性能方面的开销较大,会降低仿真速度(尤其是投射阴影时)。 减少光照数量可以提高渲染速度。 [PointLight(https://cyberbotics.com/doc/reference/pointlight) 比 [SpotLight(https://cyberbotics.com/doc/reference/spotlight) 更高效,但效率低于 [DirectionalLight(https://cyberbotics.com/doc/reference/directionallight)。
在本仿真中,[Light(https://cyberbotics.com/doc/reference/light) 节点在场景树中不可见,因为它包含在 TexturedBackgroundLight PROTO 节点之内。 它由一个 [DirectionalLight(https://cyberbotics.com/doc/reference/directionallight) 组成,其强度和方向会根据场景背景自动计算。
修改墙壁的外观
本节的目标是将墙壁染成蓝色。
[Shape(https://cyberbotics.com/doc/reference/shape) 节点的 [Appearance(https://cyberbotics.com/doc/reference/appearance) 和 [PBRAppearance(https://cyberbotics.com/doc/reference/pbrappearance) 节点决定对象的图形外观。 除其他功能外,这些节点负责对象的颜色和纹理。
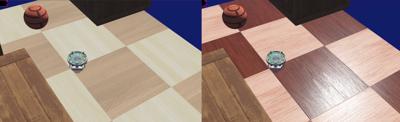
为获得更好的渲染效果,推荐使用 [PBRAppearances(https://cyberbotics.com/doc/reference/pbrappearance),如下面的对比所示。
动手实践 #2:在图形化表示第一面墙的 [Shape(https://cyberbotics.com/doc/reference/shape) 节点中,向
appearance字段添加一个 [PBRAppearance(https://cyberbotics.com/doc/reference/pbrappearance) 节点。
- 使用颜色选择器将其
baseColor字段设置为蓝色。 - 使用字段编辑器将其
metalness字段设置为 0。 - 最后,使用字段编辑器将其
roughness字段设置为 0.5。 - 如果上一个教程中的 DEF-USE 机制实现正确,所有的墙壁都应该变成蓝色。
为球添加已有的外观
Webots 发行版中提供了许多预定义的 [PBRAppearance(https://cyberbotics.com/doc/reference/pbrappearance)。
动手实践 #3:添加一个预定义的 [PBRAppearance(https://cyberbotics.com/doc/reference/pbrappearance)
- 选中
appearance字段并删除先前添加的节点。 为此,可以按键盘上的 "delete" 键,或者右键单击该字段并在菜单中选择 "delete"。 此时该字段应显示 "appearance NULL" 而不是 "appearance PBRAppearance"。 - 再次双击该字段,然后导航到
PROTO nodes (Webots Projects),接着进入appearances并选择OldSteel (PBRAppearance)。
从磁盘添加纹理
本节的目标是在球上应用一个本地可用的纹理。 滚动对象上的纹理有助于观察其运动。
动手实践 #4:为球添加一个本地可用的纹理。
- 下载此处提供的纹理并保存到磁盘。
- 从
appearance字段中删除先前添加的节点,改为添加一个 [PBRAppearance(https://cyberbotics.com/doc/reference/pbrappearance) 节点。 - 向 [PBRAppearance(https://cyberbotics.com/doc/reference/pbrappearance) 节点的
baseColorMap字段添加一个 [ImageTexture(https://cyberbotics.com/doc/reference/imagetexture) 节点。 - 使用
Add按钮向 [ImageTexture(https://cyberbotics.com/doc/reference/imagetexture) 的url字段添加一个条目。 - 然后使用 "Select" 按钮设置新添加的
url条目的值。 - 浏览到你保存纹理的位置并选中它。
纹理 URL 必须相对于你项目目录中的 worlds 目录定义,或者相对于默认项目目录 WEBOTS_HOME/projects/default/worlds 定义。
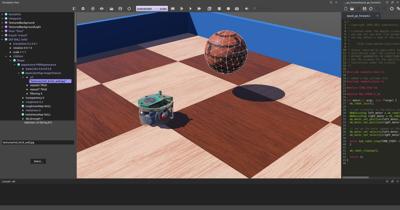
用图像查看器打开 red_brick_wall.jpg 纹理,同时在 Webots 中观察它是如何映射到 [Sphere(https://cyberbotics.com/doc/reference/sphere) 节点上的。
纹理根据[参考手册(https://cyberbotics.com/doc/reference/imagetexture)中描述的预定义 UV 映射函数映射到几何(Geometry)节点上。 UV 映射函数将 2D 图像表示映射到 3D 模型。
渲染选项
Webots 在 View 菜单中提供了多种渲染模式。
动手实践 #5:使用
View / Wireframe Rendering菜单项以线框模式查看仿真。 然后恢复普通渲染模式:View / Plain Rendering。
其他渲染功能也很有用:
- 查看坐标系:
View / Optional Rendering / Show Coordinates Systemctrl-F1 - 查看距离传感器射线:
View / Optional Rendering / Show DistanceSensor Raysctrl-F10
解决方案:世界文件
要将你的世界与解决方案进行比较,请在你的文件中找到[教程 1(tutorial-1-your-first-simulation-in-webots.html)中创建的名为 "my_first_simulation" 的文件夹,然后进入 "worlds" 文件夹,用文本编辑器打开对应的世界文件。 本解决方案与其他解决方案一样,位于解决方案目录中。
结论
在本教程中,你学会了如何使用 [PBRAppearance(https://cyberbotics.com/doc/reference/pbrappearance) 节点和光照节点来搭建一个外观精美的环境。
你可以通过阅读 Reference Manual 中这些节点的详细描述来进一步深入了解该主题。
这份 FAQ 将为你提供一种高效配置这些节点的方法。