教程 1:你在 Webots 中的第一个仿真(30 分钟)
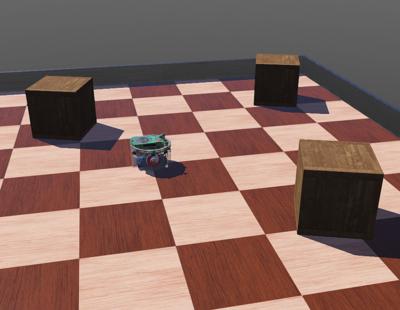
本教程的第一个目标是让你熟悉用户界面以及 Webots 的基本概念。 你将创建自己的第一个仿真,其中包含一个简单的环境:一个带有地板和墙壁的竞技场、几个箱子、一个 e-puck 机器人,以及一个让机器人移动的控制器程序。
启动 Webots
如果尚未完成,请按照这些[安装说明(installing-webots.html)下载并安装 Webots。
实操 #1:双击 Webots 图标[启动 Webots(starting-webots.html)(或在终端中通过命令行启动它)。 如果你是在这台电脑上第一次运行 Webots,系统可能会提示你选择一个图形主题。 你也可能会被邀请体验 Webots 引导之旅,请直接关闭引导之旅即可。
如果你还没有看过引导之旅,请花点时间观看其中展示的演示。 它们充分展示了 Webots 的各种可能性。 引导之旅也可以从 Webots 的 Help(帮助)菜单中打开。
创建新世界
世界(World) 是一个文件,其中包含对象的位置、外观、对象之间的交互方式、天空的颜色等信息,以及重力、摩擦、对象质量等的定义。
它定义了仿真的初始状态。
其中的不同对象称为节点(Node),并在场景树(Scene Tree) 中以层次结构组织。
因此,一个节点可以包含子节点。
世界保存在扩展名为 .wbt 的文件中。
文件格式派生自 VRML97 语言,且人类可读。
世界文件必须直接存放在名为 worlds 的目录中。
实操 #2:点击 3D 视图中的
Pause(暂停)按钮以暂停当前仿真(要了解各个按钮,请参见[用户界面说明(the-user-interface.html#simulation-menu))。 如果主工具栏上的虚拟时间计数器停止,则说明仿真已处于暂停状态。 通过 File / New / New Project Directory...(文件 / 新建 / 新建工程目录……)菜单项创建一个新项目,并按照提示操作:
- 将工程目录命名为
my_first_simulation,而不是建议的my_project。 - 将世界文件命名为
my_first_simulation.wbt,而不是建议的empty.wbt。 - 勾选所有复选框,包括默认未勾选的 "Add a rectangle arena"(添加矩形竞技场)。
Webots 会显示它刚刚创建的一系列目录和文件列表。
这对应于 [Webots 工程的标准文件层次结构(the-standard-file-hierarchy-of-a-project.html)。
点击 Finish(Windows、Linux)或 Done(macOS)按钮以关闭此窗口。
祝贺你,你刚刚创建了自己的第一个 Webots 世界! 3D 视图应该显示一个带棋盘格地板的正方形竞技场。 你可以[使用鼠标(the-3d-window.html#navigation-in-the-scene)在 3D 视图中移动视点:左键、右键和滚轮。
存放在世界文件中的 Webots 节点以树结构组织,称为场景树。 场景树可以在主窗口的两个子窗口中查看:[3D 视图(the-3d-window.html)(位于主窗口中央)是场景树的三维表示,而[场景树视图(the-scene-tree.html)(位于左侧)是场景树的层次化表示。 [场景树视图(the-scene-tree.html) 是修改节点和字段的地方。 它当前应列出以下节点:
- [WorldInfo(https://cyberbotics.com/doc/reference/worldinfo):包含仿真的全局参数。
- [Viewpoint(https://cyberbotics.com/doc/reference/viewpoint):定义主视点摄像机的参数。
- TexturedBackground:定义场景的背景(如果你稍微旋转视点,应该能看到远处的山脉)
- TexturedBackgroundLight:定义与上述背景相关联的光源。
- RectangleArena:定义到目前为止你在场景中看到的唯一对象。
每个节点都有一些可自定义的属性,称为字段(Field)。 让我们修改这些字段来改变矩形竞技场:
实操 #3:在场景树中双击
RectangleArena节点。 这应该会展开该节点并显示它的字段。
- 选择
floorTileSize字段,把它的值设置为0.25 0.25,而不是0.5 0.5。 你应该能在 3D 视图中立即看到效果。 - 选择
wallHeight字段,把它的值改为0.05,而不是0.1。 竞技场的墙壁现在应该更低了。
在[场景树视图(the-scene-tree.html)中,如果字段的值与其默认值不同,则会以不同的颜色显示(取决于主题)。 现在,我们想添加一些对象:
实操 #4:在场景树中双击
RectangleArena以关闭并选中它。 点击场景树顶部的Add(添加)按钮。 在打开的对话框中,选择
PROTO nodes (Webots Projects) / objects / factory / containers / WoodenBox (Solid)。 一个大箱子应该出现在竞技场中央。 在场景树中双击它以展开其字段。
- 将它的
size改为0.1 0.1 0.1,而不是0.6 0.6 0.6。 - 将它的
translation改为0 0 0.05,而不是0 0 0.3。 或者,你可以使用 3D 视图中出现的蓝色箭头来调整它的translation.z字段。 - 现在按住 shift 键点击箱子并拖动,把它移到竞技场的某个角落。
- 选中该箱子并按下 ctrl-C、ctrl-V(Windows、Linux)或 ⌘ command-C、⌘ command-V(macOS)来复制并粘贴它。 按住 shift 键点击并拖拽新箱子,把它移到另一个位置。 用同样的方式创建第三个箱子。
- 移动各个箱子,使没有任何箱子位于竞技场中心。
你也可以使用蓝色的旋转手柄绕垂直轴旋转箱子。
这也可以通过按住 shift 键并用鼠标右键点击拖拽来完成。
或者,你可以在场景树中修改
WoodenBox节点的rotation字段的角度。 - 当你对结果满意后,使用保存按钮保存世界。
使用平移和旋转手柄移动对象的方法在[本节(the-3d-window.html#axis-aligned-handles)中有说明。
添加一个 e-puck 机器人
e-puck 是一个小型机器人,具有差速轮、10 个 [LED(https://cyberbotics.com/doc/reference/led) 以及多个传感器,包括 8 个 [DistanceSensors(https://cyberbotics.com/doc/reference/distancesensor) 和一个 [Camera(https://cyberbotics.com/doc/reference/camera)。 在本教程中,我们只关心使用它的轮子。 我们将在后续教程中学习如何使用其他功能。
现在,我们要向世界添加一个 e-puck 模型。
确保仿真处于暂停状态,且经过的虚拟时间为 0。
如果不是这样,请用 Reset(重置)按钮  重置仿真。
重置仿真。
当修改 Webots 世界并打算保存时,至关重要的一点是:必须先暂停仿真并将其重新加载到初始状态,也就是说,主工具栏上的虚拟时间计数器应显示 0:00:00:000。 否则,每次保存时,每个三维对象的位置都会累积误差。 因此,对世界的任何修改都应按此顺序进行:暂停、重置、修改并保存仿真。
我们不需要从零开始创建 e-puck 机器人,只需要导入一个 E-puck 节点即可。
这个节点实际上是一个 [PROTO(https://cyberbotics.com/doc/reference/proto) 节点,就像我们之前介绍的 RectangleArena 或 WoodenBox。原型化允许你创建自定义对象并加以复用。
实操 #5:在场景树视图中选中最后一个节点
WoodenBox。 点击场景树视图顶部的Add(添加)按钮PROTO nodes (Webots Projects) / robots / gctronic / e-puck / E-puck (Robot)。 一个 e-puck 机器人应该出现在竞技场中央。 用你移动箱子的同样方式移动并旋转这个机器人。 保存仿真并点击Run real-time(实时运行)按钮。
机器人应该会移动、闪烁 LED 并避开障碍物。 这是因为它带有一个具有该行为的默认控制器。 你可能已经注意到 3D 视图左上角出现了一个黑色小窗口。 它显示的是 e-puck 机器人的 [Camera(https://cyberbotics.com/doc/reference/camera) 拍摄的画面。 在机器人控制器显式启用摄像机之前,这个画面将保持黑色。 这个小的图像窗口可以通过拖动来[移动(the-3d-window.html#moving-and-resizing-overlays)。 也可以通过拖拽右下角来[调整大小(the-3d-window.html#moving-and-resizing-overlays)。 最后,点击右上角的 "x" 可以关闭它。 你可以从 Overlays(叠加层)菜单,在 Camera Devices(摄像机设备)子菜单中选中它来使其重新可见。 由于我们不需要它,你现在就可以把它关闭。
现在,在仿真运行期间,让我们来玩玩物理:
实操 #6:通过按下 alt + 左键点击 + 拖拽 对机器人[施加一个力(the-3d-window.html#applying-a-force-to-a-solid-object-with-physics)(某些 Mac 键盘上使用 ⌥ option 键)。 在 Linux 上,除了 alt + 左键点击 + 拖拽 之外,你还应按住 ctrl 键。 无法对
WoodenBox节点施加力,因为默认情况下它们没有质量,被视为粘在地板上。 要在WoodenBox节点上启用物理,你应该把它们的mass字段设置为某个值(例如 0.2 kg)。 完成这一步之后,你也应该能对它们施加力了。
仿真可以被暂停 、逐步运行  、以实时 模式或以快速
  模式运行。
模式运行。
现在我们要修改世界,减小物理仿真的步长:这会提高仿真的精度和稳定性(但会降低最大仿真速度)。
实操 #7:暂停仿真并回退。 在场景树视图中,展开 [WorldInfo(https://cyberbotics.com/doc/reference/worldinfo) 节点(第一个节点)。 将它的
basicTimeStep字段设置为 16。 然后保存仿真。
创建新控制器
现在,我们将编写一个简单的控制器,只让机器人向前移动。
控制器 是一个定义机器人行为的程序。 Webots 控制器可以用以下编程语言编写:C、C++、Java、Python、MATLAB 等。 C、C++ 和 Java 控制器需要先编译,才能作为机器人控制器运行。 Python 和 MATLAB 控制器属于解释型语言,因此无需编译即可运行。 在本教程中,我们将以 C 作为参考语言,但所有代码片段同样提供 C++、Java、Python 和 MATLAB 版本。 如需使用其他编程语言设置控制器,请参考[编程语言章节(language-setup.html)。
Robot 节点的 controller 字段指定了当前与机器人关联的控制器。
注意,同一个控制器可以被多个机器人使用,但一个机器人一次只能使用一个控制器。
每个控制器都在一个独立的子进程中执行,该进程通常由 Webots 派生。
由于它们是独立的进程,控制器不共享同一地址空间,并且可以在不同的处理器核心上运行。
实操 #8:使用 File / New / New Robot Controller...(文件 / 新建 / 新建机器人控制器……)菜单项创建一个名为
epuck_go_forward的新 C(或任何其他语言)控制器(对于 C++ 和 Java,请将其命名为EPuckGoForward)。 这会在my_first_simulation/controllers中创建一个名为epuck_go_forward(或EPuckGoForward)的新目录。 选择提供在文本编辑器中打开源文件的选项。
新的源文件会显示在 Webots 文本编辑器窗口中。
该源文件无需任何修改即可编译(如果以 C、C++ 或 Java 编写),不过当前的代码并没有实际效果。
现在我们要把新的 epuck_go_forward(或 EPuckGoForward)控制器关联到 E-puck 节点。
实操 #9:在场景树视图中,选择 E-puck 节点的 controller 字段,然后使用场景树视图底部的字段编辑器:按下 Select...(选择……)按钮,然后在列表中选择 epuck_go_forward。
一旦控制器与机器人关联,保存世界。
通过插入一条 include 语句(#include <webots/motor.h>)、获取马达设备(WbDeviceTag motor = wb_robot_get_device("motor_name");),并应用一条马达命令(wb_motor_set_position(motor, 10);)来修改程序:
#include <webots/robot.h>

// Added a new include file
#include <webots/motor.h>

int main(int argc, char **argv) {
 wb_robot_init();

 // get the time step of the current world
 const int time_step = (int) wb_robot_get_basic_time_step();

 // get the motor devices
 WbDeviceTag left_motor = wb_robot_get_device("left wheel motor");
 WbDeviceTag right_motor = wb_robot_get_device("right wheel motor");
 // set the target position of the motors
 wb_motor_set_position(left_motor, 10.0);
 wb_motor_set_position(right_motor, 10.0);

 while (wb_robot_step(time_step) != -1);

 wb_robot_cleanup();

 return 0;
}保存修改后的源代码(File / Save Text File),并进行编译(Build / Build)。
如有编译错误,请修正。
当 Webots 提出重置或重新加载世界时,选择 Reset 并运行仿真。
实操 #9:在场景树视图中,选择 E-puck 节点的 controller 字段,然后使用场景树视图底部的字段编辑器:按下 Select...(选择……)按钮,然后在列表中选择 EPuckGoForward。
一旦控制器与机器人关联,保存世界。
通过插入一条 include 语句(#include <webots/Motor.hpp>)、获取马达设备(Motor *leftMotor = robot->getMotor("left wheel motor");),并应用一条马达命令(leftMotor->setPosition(10.0);)来修改程序:
#include <webots/Robot.hpp>

// Added a new include file
#include <webots/Motor.hpp>

// All the webots classes are defined in the "webots" namespace
using namespace webots;

int main(int argc, char **argv) {
 Robot *robot = new Robot();

 // get the time step of the current world
 int timeStep = (int)robot->getBasicTimeStep();

 // get the motor devices
 Motor *leftMotor = robot->getMotor("left wheel motor");
 Motor *rightMotor = robot->getMotor("right wheel motor");
 // set the target position of the motors
 leftMotor->setPosition(10.0);
 rightMotor->setPosition(10.0);

 while (robot->step(timeStep) != -1);

 delete robot;

 return 0;
}保存修改后的源代码(File / Save Text File),并进行编译(Build / Build)。
如有编译错误,请修正。
当 Webots 提出重置或重新加载世界时,选择 Reset 并运行仿真。
实操 #9:在场景树视图中,选择 E-puck 节点的 controller 字段,然后使用场景树视图底部的字段编辑器:按下 Select...(选择……)按钮,然后在列表中选择 epuck_go_forward。
一旦控制器与机器人关联,保存世界。
通过获取马达设备(leftMotor = robot.getDevice('left wheel motor')),并应用一条马达命令(leftMotor.setPosition(10.0))来修改程序:
from controller import Robot, Motor

# create the Robot instance.
robot = Robot()

# get the time step of the current world
timestep = int(robot.getBasicTimeStep())

# get the motor devices
leftMotor = robot.getDevice('left wheel motor')
rightMotor = robot.getDevice('right wheel motor')
# set the target position of the motors
leftMotor.setPosition(10.0)
rightMotor.setPosition(10.0)

while robot.step(timestep) != -1:
pass保存修改后的源代码(File / Save Text File),重置并运行仿真。
实操 #9:在场景树视图中,选择 E-puck 节点的 controller 字段,然后使用场景树视图底部的字段编辑器:按下 Select...(选择……)按钮,然后在列表中选择 EPuckGoForward。
一旦控制器与机器人关联,保存世界。
通过插入一条 import 语句(import com.cyberbotics.webots.controller.Motor;)、获取马达设备(Motor leftMotor = robot.getMotor("left wheel motor");),并应用一条马达命令(leftMotor.setPosition(10.0);)来修改程序:
import com.cyberbotics.webots.controller.Robot;

// Added a new include file
import com.cyberbotics.webots.controller.Motor;

public class EPuckGoForward {

 public static void main(String[] args) {

   Robot robot = new Robot();

   // get the time step of the current world.
   int timeStep = (int) robot.getBasicTimeStep();

   // get the motor devices
   Motor leftMotor = robot.getMotor("left wheel motor");
   Motor rightMotor = robot.getMotor("right wheel motor");
   // set the target position of the motors
   leftMotor.setPosition(10.0);
   rightMotor.setPosition(10.0);

   while (robot.step(timeStep) != -1);
 }
}保存修改后的源代码(File / Save Text File),并进行编译(Build / Build)。
如有编译错误,请修正。
当 Webots 提出重置或重新加载世界时,选择 Reset 并运行仿真。
实操 #9:在场景树视图中,选择 E-puck 节点的 controller 字段,然后使用场景树视图底部的字段编辑器:按下 Select...(选择……)按钮,然后在列表中选择 epuck_go_forward。
一旦控制器与机器人关联,保存世界。
通过获取马达设备(left_motor = wb_robot_get_device('left wheel motor'))并应用一条马达命令(wb_motor_set_position(right_motor, 10.0))来修改程序:
function epuck_go_forward

% get the time step of the current world
TIME_STEP = wb_robot_get_basic_time_step();

% get the motor devices
left_motor = wb_robot_get_device('left wheel motor');
right_motor = wb_robot_get_device('right wheel motor');
% set the target position of the motors
wb_motor_set_position(left_motor, 10.0);
wb_motor_set_position(right_motor, 10.0);

while wb_robot_step(TIME_STEP) ~= -1
end保存修改后的源代码(File / Save Text File),重置并运行仿真。
如果一切顺利,你的机器人应该会向前移动。 机器人将以最高速度移动一段时间,然后在轮子转过 10 弧度后停止。
在你的工程的 controllers 目录中,已经创建了一个包含 epuck_go_forward(或 EPuckGoForward)控制器的目录。
epuck_go_forward(或 EPuckGoForward)目录中包含一个 epuck_go_forward(或 EPuckGoForward)二进制文件,它是在控制器编译之后生成的(在 Windows 上,该文件带有 .exe 扩展名)。
控制器目录名应与二进制文件名一致。
扩展控制器以实现速度控制
机器人的轮子通常使用速度来控制,而不是像我们在上一个示例中那样使用位置。 要以速度控制轮子的马达,你需要把目标位置设置为无穷大,并设置期望的速度:
实操 #10:按下面所示修改控制器程序,重新编译并运行:
#include <webots/robot.h>

// Added a new include file
#include <webots/motor.h>

#define MAX_SPEED 6.28

int main(int argc, char **argv) {
  wb_robot_init();

  // get the time step of the current world
  const int time_step = (int) wb_robot_get_basic_time_step();

  // get a handler to the motors and set target position to infinity (speed control)
  WbDeviceTag left_motor = wb_robot_get_device("left wheel motor");
  WbDeviceTag right_motor = wb_robot_get_device("right wheel motor");
  wb_motor_set_position(left_motor, INFINITY);
  wb_motor_set_position(right_motor, INFINITY);

  // set up the motor speeds at 10% of the MAX_SPEED.
  wb_motor_set_velocity(left_motor, 0.1 * MAX_SPEED);
  wb_motor_set_velocity(right_motor, 0.1 * MAX_SPEED);

  while (wb_robot_step(time_step) != -1) {
  }

  wb_robot_cleanup();

  return 0;
}
实操 #10:按下面所示修改控制器程序,重新编译并运行:
#include <webots/Robot.hpp>

// Added a new include file
#include <webots/Motor.hpp>

#define MAX_SPEED 6.28

// All the webots classes are defined in the "webots" namespace
using namespace webots;

int main(int argc, char **argv) {
 Robot *robot = new Robot();

 // get the time step of the current world
 int timeStep = (int)robot->getBasicTimeStep();

 // get a handler to the motors and set target position to infinity (speed control)
 Motor *leftMotor = robot->getMotor("left wheel motor");
 Motor *rightMotor = robot->getMotor("right wheel motor");
 leftMotor->setPosition(INFINITY);
 rightMotor->setPosition(INFINITY);

 // set up the motor speeds at 10% of the MAX_SPEED.
 leftMotor->setVelocity(0.1 * MAX_SPEED);
 rightMotor->setVelocity(0.1 * MAX_SPEED);

 while (robot->step(timeStep) != -1);

 delete robot;

 return 0;
}
实操 #10:按下面所示修改控制器程序,重新编译并运行:
from controller import Robot, Motor

MAX_SPEED = 6.28

# create the Robot instance.
robot = Robot()

# get the time step of the current world
timestep = int(robot.getBasicTimeStep())

# get a handler to the motors and set target position to infinity (speed control)
leftMotor = robot.getDevice('left wheel motor')
rightMotor = robot.getDevice('right wheel motor')
leftMotor.setPosition(float('inf'))
rightMotor.setPosition(float('inf'))

# set up the motor speeds at 10% of the MAX_SPEED.
leftMotor.setVelocity(0.1 * MAX_SPEED)
rightMotor.setVelocity(0.1 * MAX_SPEED)

while robot.step(timestep) != -1:
   pass
实操 #10:按下面所示修改控制器程序,重新编译并运行:
import com.cyberbotics.webots.controller.Robot;

// Added a new include file
import com.cyberbotics.webots.controller.Motor;

public class EPuckGoForward {

 public static void main(String[] args) {

   double MAX_SPEED = 6.28;

   Robot robot = new Robot();

   // get the time step of the current world.
   int timeStep = (int)robot.getBasicTimeStep();

   // get a handler to the motors and set target position to infinity (speed control)
   Motor leftMotor = robot.getMotor("left wheel motor");
   Motor rightMotor = robot.getMotor("right wheel motor");
   leftMotor.setPosition(Double.POSITIVE_INFINITY);
   rightMotor.setPosition(Double.POSITIVE_INFINITY);

   // set up the motor speeds at 10% of the MAX_SPEED.
   leftMotor.setVelocity(0.1 * MAX_SPEED);
   rightMotor.setVelocity(0.1 * MAX_SPEED);

   while (robot.step(timeStep) != -1);
 }
}
实操 #10:按下面所示修改控制器程序,重新编译并运行:
function epuck_go_forward

MAX_SPEED = 6.28;

% get the time step of the current world
TIME_STEP = wb_robot_get_basic_time_step();

% get a handler to the motors and set target position to infinity (speed control)
left_motor = wb_robot_get_device('left wheel motor');
right_motor = wb_robot_get_device('right wheel motor');
wb_motor_set_position(left_motor, inf);
wb_motor_set_position(right_motor, inf);

% set up the motor speeds at 10% of the MAX_SPEED.
wb_motor_set_velocity(left_motor, 0.1 * MAX_SPEED);
wb_motor_set_velocity(right_motor, 0.1 * MAX_SPEED);

while wb_robot_step(TIME_STEP) ~= -1
end
现在机器人将会移动(轮子将以每秒 0.2 弧度的速度旋转)并且永不停止。
如果没有任何反应,别忘了通过选择 Build / Build 菜单项或点击代码区域上方的齿轮图标  来编译你的代码。
编译错误会以红色显示在控制台中。
如果有错误,请修正它们并重新尝试编译。
然后,重新加载世界。
来编译你的代码。
编译错误会以红色显示在控制台中。
如果有错误,请修正它们并重新尝试编译。
然后,重新加载世界。
结论
我们希望你喜欢上了创建自己的第一个 Webots 仿真。 你已经能够搭建一个世界、添加一个机器人并对其进行编程。 重要的是,你学到了下面总结的基本概念:
- 世界由以树结构组织的节点组成。
- 世界保存在
.wbt文件中,存放于 Webots 工程内。 - 工程中还包含机器人控制器程序,它们定义了机器人的行为。
- 控制器可以用 C 或其他语言编写。
- C、C++ 和 Java 控制器必须先显式编译,才能执行。
- 控制器通过
Robot节点的controller字段与机器人相关联。